TablePress Extensions

Automatic URL conversion

Download:
Automatic URL conversion Extension 1.3

To add links to table cells, you’ll in general need to manually enter the HTML code for a link (something like <a href="https://www.example.com/">My Link</a>) into a cell or use the “Insert Link” button, that will ask you for the URL and the link text and then generates the necessary HTML code for you. This is the recommended way and for most needs it works fine. It also allows for the most flexibility, because you have all freedom to alter or extend that HTML code as you like, e.g. by adding further attributes or a different link text.

Unfortunately it can be a real hassle and a lot of work, if all you want to achieve is, to make URLs you enter “clickable”, i.e. to make them valid HTML links. That can for example be the case when you import a table from a file, because in most cases URLs are not exported as HTML links by a program but simply as the plain URL in text form.

And this is were this Extension kicks in. When a table is shown in a post or page, the Extension will check if there’s an URL (for www, ftp or an email address) somewhere. And if it finds one, it will replace the URL with a complete HTML link to that URL that can be clicked by the visitor. The good thing: If there already was a complete HTML link, it will be left intact.

Here’s an example:

A cell with the content

https://www.example.com/

https://www.example.com/

Code language: HTML, XML (xml)

will automatically be converted to a clickable link:

<a href="https://www.example.com/">https://www.example.com/</a>

Code language: HTML, XML (xml)

To use this, download, install, and activate the Extension like a regular WordPress plugin. Then, on the page where you want to show the table, insert the extended Shortcode

[table id=123 automatic_url_conversion=true /]

Code language: JSON / JSON with Comments (json)

and change the 123 to the desired table ID. This will activate the automatic URL conversion for that table.

Additionally, some people might want to have links open in a new browser window or tab automatically (Note that this is not recommended by web experts, as it takes away the user’s freedom and is considered bad for accessibility reasons. Personally, I totally agree with them, I hate when a site does this.). If you also want to do that, just extend your Shortcode with another parameter, to

[table id=123 automatic_url_conversion=true automatic_url_conversion_new_window=true /]

Code language: JSON / JSON with Comments (json)

The automatic_url_conversion_new_window will add the HTML target="_blank" attribute to the link HTML, which tells the browser to open the link in a new window or tab.

If you want links to have the rel="nofollow" attribute set, so that search engines don’t follow the link, just add the automatic_url_conversion_rel_nofollow parameter to the Shortcode:

[table id=123 automatic_url_conversion=true automatic_url_conversion_rel_nofollow=true /]

Single Cell Content Shortcode

Download:
Single Cell Content Shortcode Extension 1.1

For some use cases, it might be necessary to get the value of a single cell from a table.

To use this, download, install, and activate the Extension like a regular WordPress plugin. You can then use a Shortcode like

[table-cell id=123 cell=C3 /]

Code language: JSON / JSON with Comments (json)

or (if you prefer a different syntax)

[table-cell id=123 row=3 column=3 /]

Code language: JSON / JSON with Comments (json)

in your posts or pages.

Both examples would print the content of the cell C3 (third row, third column) of the table with the ID 123 to the page.

Note that this Extension will only print the “raw” and unmodified cell value. This also means that it can not be used to show e.g. calculated results of math formulas.

DataTables Sorting plugins

Download:
DataTables Sorting plugins Extension 1.0

Certain data types, such as currency values with currency symbols, numbers combined with text, or European dates, need special attention when they are sorted. The reason for that is that they differ from the data formats for which the DataTables JavaScript library has sorting algorithms built-in. To use such data types with TablePress, download, install and activate the DataTables Sorting plugins Extension like a regular WordPress plugin.

Currencies, numbers with text, and dates

Data types like formatted numbers (e.g. numbers with unit), currencies, European date formats (dd.mm(.yyyy) or dd/mm(/yyyy)) will then be recognized automatically, so that they are sorted correctly. Sometimes, it might be necessary to force the data type on a column. That’s possible by adding the following code to the “Custom Commands” text field in the “Features of the DataTables JavaScript library” section on the “Edit” screen of the table:

"columnDefs": [ { "type": "formatted-num", "targets": [ 2, 3 ] } ]

Code language: JavaScript (javascript)

The 2, 3 in that code is a zero-based list of all columns that shall be sorted as values with commas as the decimal separator. Here, 2, 3 means that the third and fourth column are sorted like this, as the counting starts with 0 for the first column.

Using different thousand or decimal separators

In large parts of the world, mostly the English-speaking part, a number is written like “100,000.00”, where the comma is the thousand separator, and the period is the decimal separator. In many countries, for example in Europe, the format “100.000,00” is more common. Although a number in computing usually uses the English format, TablePress can use both formats, if it’s instructed to do so. That can be done via the translation file for the DataTables JavaScript library. If the used language matches the format, this will happen automatically. Otherwise, you can use the extra parameter datatables_locale="de_DE" (as an example for German) in the Shortcode. To set custom thousand and decimal separators, the Change DataTables String Extension can be used.

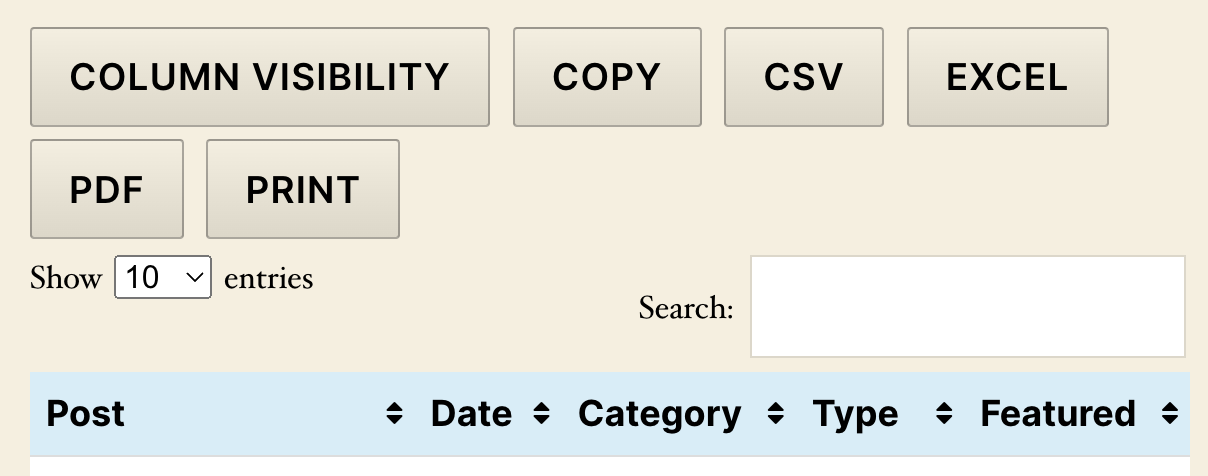
Pagination Length Change “All” Entry

Download:
Pagination Length Change “All” entry Extension 1.2

For some large tables, it can be beneficial to add an “All” entry to the Pagination Length Change dropdown box in the upper left corner of the table (if pagination is enabled). This can be achieved by using this Extension, which needs to be downloaded, installed, and activated like a regular WordPress plugin. After that, the Pagination Length Change dropdown box will have an “All” entry. If you want this to be in your language, just change the word All in line 33

$length_menu_values[] = '"All"';

Code language: PHP (php)

of the Extension’s tablepress-length-change-all.php file to the desired translated word. However, pay attention to not accidentally change the quotation marks around it!

Change DataTables strings

Download:
Change DataTables strings Extension 1.2

Sometimes it is necessary or desired to change certain text strings of the features like Search and Pagination, that are visible around a table. An example would be to change the word “Search:” to “Filter:” or similar. To achieve that, let’s first look at where these strings are stored. The “i18n/datatables/” folder of TablePress contains one DataTables language file for each available language. The file looks similar to this (this is the English file):

{
    "emptyTable":       "No data available in table",
    "info":             "Showing _START_ to _END_ of _TOTAL_ entries",
    "infoEmpty":        "Showing 0 to 0 of 0 entries",
    "infoFiltered":     "(filtered from _MAX_ total entries)",
    "infoPostFix":      "",
    "lengthMenu":       "Show _MENU_ entries",
    "loadingRecords":   "Loading...",
    "processing":       "Processing...",
    "search":           "Search:",
    "zeroRecords":      "No matching records found",
    "paginate": {
        "first":        "First",
        "previous":     "Previous",
        "next":         "Next",
        "last":         "Last"
    },
    "aria": {
        "sortAscending":    ": activate to sort column ascending",
        "sortDescending":   ": activate to sort column descending"
    },
    "decimal":          "",
    "thousands":        ","
}

Code language: JSON / JSON with Comments (json)

Changing strings directly in these files is a bad idea, as these changes would be reverted after each TablePress update (due to the way how plugin updates work). The Change DataTables strings Extension is a way around this problem.

Most strings in this file are self-explaining. Two of them are however not used for translations but for setting the data format of a number, e.g. for the sorting feature. Using the "decimal" and "thousands" parameters, the used number format can be changed. The default values in the example above will result in the traditional English format for a number, “100,000.00”. To use e.g. “100.000,00”, which is more common in Europe, the values have to be changed to "decimal": "," and "thousands": ".".

To use this Extension, just install and activate it like a regular WordPress plugin. Then copy the “lang-xy_XY.json” file of your language from the “tablepress/i18n/datatables/” folder to the “tablepress-change-datatables-strings” folder. (The “en_US” file is already in that folder, as an example.)
You can now change any string that is on the right side of a colon (:) in that copied file. Make sure to not remove any of the quotation marks. Also, you can not use quotation marks in your changed strings! The words that are surrounded by an underscore (_) are placeholders for the numbers or input fields that are automatically added by the DataTables script. You must not alter those (you can however put them in a new place within the string).
With the Extension activated, TablePress will now use the strings from the modified file.

Responsive Tables

Usage instructions

Download:
Responsive Tables Extension 1.8 (PRO)

To use these modes with your tables, download, install, and activate the Extension like a regular WordPress plugin. Then, on the page where you are showing your table, adjust your table’s Shortcode from something like

[table id=123 /]

to

[table id=123 responsive=mode /]

where mode is one of the four values flip, scroll, collapse, or stack, depending on which of the above mode you want to use with the table.

The flip and stack modes (but not the others!) can be further customized, by adding another parameter that defines for which screen sizes the mode should be used:

For the flip mode:

[table id=123 responsive=flip responsive_breakpoint=phone /]

For the stack mode:

[table id=123 responsive=stack responsive_breakpoint=phone /]

Here, the value of theresponsive_breakpoint parameter (possible values are phone, tablet, desktop, and all) sets the biggest screen size for which the flip or stack mode shall be used, according to this list:

  • phone: The flip or stack mode is used only on phones (devices with a screen width smaller than 768 pixels)
  • tablet: The flip or stack mode is used on phones and tablets (devices with a screen width smaller than 980 pixels)
  • desktop: The flip or stack mode is used on phones, tablets, and medium-sized desktop monitors (devices with a screen width smaller than 1200 pixels)
  • all: The flip or stack mode is used on all screens, regardless of their screen size

Change the [table] Shortcode

Changing the name of the used Shortcode can be useful in several cases:

  • You want it to be in your native language (i.e. for German: Tabelle instead of table).
  • Another plugin or the theme is already using table as its Shortcode. (The Mural theme does this, among others.)
  • Your generated tables resemble something specific, i.e. a set of data, or a ranking.

This Extension will allow you to change the Shortcode from e.g.

[table id=1 /]

to

[ranking id=1 /]

Of course you can change ranking to anything you like, by simply editing the source code in the Extension’s PHP file.

To use this Extension, just install and activate it like a regular WordPress plugin, and change the code in the PHP file to the desired Shortcode.

Change the Admin Menu Name

By default, TablePress will be added as “TablePress” to the WordPress Admin Menu in the Dashboard, on the left side of the screen. This Extension allows to change that to any other string, for example “Tables”. This might be useful when the plugin is used in commercial projects.

To use this, just install and activate the Extension like a regular WordPress plugin. To get a different admin menu name than “Tables”, just change the string in the file tablepress-change-admin-menu-name.php accordingly.

Larger Edit Input fields

Just install and activate it like a regular WordPress plugin. The text fields on the “Edit” screen will then be bigger. If you want them to be even larger, just change the numbers for min-width and height in the source code of the file tablepress-edit-field-size.php .

Automatic URL conversion

To add links to table cells, you’ll in general need to manually enter the HTML code for a link (something like <a href="https://www.example.com/">My Link</a>) into a cell or use the “Insert Link” button, that will ask you for the URL and the link text and then generates the necessary HTML code for you. This is the recommended way and for most needs it works fine. It also allows for the most flexibility, because you have all freedom to alter or extend that HTML code as you like, e.g. by adding further attributes or a different link text.

Unfortunately it can be a real hassle and a lot of work, if all you want to achieve is, to make URLs you enter “clickable”, i.e. to make them valid HTML links. That can for example be the case when you import a table from a file, because in most cases URLs are not exported as HTML links by a program but simply as the plain URL in text form.

And this is were this Extension kicks in. When a table is shown in a post or page, the Extension will check if there’s an URL (for www, ftp or an email address) somewhere. And if it finds one, it will replace the URL with a complete HTML link to that URL that can be clicked by the visitor. The good thing: If there already was a complete HTML link, it will be left intact.

Here’s an example:

A cell with the content

https://www.example.com/

will automatically be converted to a clickable link:

https://www.example.com

To use this, download, install, and activate the Extension like a regular WordPress plugin. Then, on the page where you want to show the table, insert the extended Shortcode

[table id=123 automatic_url_conversion=true /]

and change the 123 to the desired table ID. This will activate the automatic URL conversion for that table.

Additionally, some people might want to have links open in a new browser window or tab automatically (Note that this is not recommended by web experts, as it takes away the user’s freedom and is considered bad for accessibility reasons. Personally, I totally agree with them, I hate when a site does this.). If you also want to do that, just extend your Shortcode with another parameter, to

[table id=123 automatic_url_conversion=true automatic_url_conversion_new_window=true /]

The automatic_url_conversion_new_window will add the HTML target="_blank" attribute to the link HTML, which tells the browser to open the link in a new window or tab.

If you want links to have the rel="nofollow" attribute set, so that search engines don’t follow the link, just add the automatic_url_conversion_rel_nofollow parameter to the Shortcode:

[table id=123 automatic_url_conversion=true automatic_url_conversion_rel_nofollow=true /]

Creating tables is a great way to display data on your WordPress site. With Gutenberg, there is a table block that will allow for basic tables to be inserted into the page. However, the tables are set to the page they live on and there is no option for importing CSV meaning tables can only be created manually.

The TablePress plugin eliminates these issues. This plugin is used to display tabular data on the page. It allows tables to live on the site’s backend and be embedded onto multiple pages through shortcodes. It also has an option for importing CSV files to prefill tables. These features allow for the easy creation of tables and enable the developers to hold tables in the library for future use.

Getting Started

To get started, download and install TablePress on your WordPress site.

Option 1: Search for TablePress. Click Install Now and Activate.

Begin by navigating to Plugins on the dashboard and click Add New. From here, there are two options for installation.

TablePress project

Option 2: Go to the plugin page, download the zip file, and upload it into the designated section under Upload Plugin.

*Check if the plugin was successfully installed and activated under Installed Plugins.

Create Table

Use one of the following two methods to create a new table.

Option 1: Navigate to TablePress on the sidebar. Hover over and click Add New Table.

TablePress menu

Option 2: Click into TablePress from the side bar. Then click Add New from the tabs at the top.

Create TablePress table

A page will open, prompting the user to fill in the initial details of a table. Here you can add a Table Name, a description ( optional), number of columns, and number of rows.

Click the Add Table button at the bottom.

This will open a new page for table data with the following sections.

Table Information: Displays the table ID, the shortcode (to be used for embedding in pages/posts), table name and description.

Table Content: Displays the table and its information.

Table Manipulation: controls editing cells, rows, and columns.

Table Options: Additional table settings.

Features of the DataTables JavaScript Library.

Add Row, Column

In the Table Manipulation section, define the number of rows you wish to add and click Add. (Note: The row will insert at the bottom of the table.)

Repeat the steps above for adding columns.

Insert Row, Column

Check the box next to the row you wish to insert an additional row. In Table Manipulation, click Insert next to Selected Rows. (Note: If you select Row 2, a blank row will be added into Row 2. The previous content will shift down).

Repeat the steps above for adding columns.

Hide Row, Column

Hiding a Row or Column will maintain the data in the table but without showing it on the frontend. To hide a row, check the box of the row you wish to hide. Then in the Table Manipulation section, click Hide next to Selected Rows.

Repeat this process for hiding columns.

Note: The hidden row/column will display in red under Table Content.

Add Links

Adding links can be a great way to incorporate other content within the table.
Highlight the content you wish to link. In Table Manipulation, click Insert Link. Fill out the information in the popup window.

Paste in an external URL or choose from existing content to prefill the link.

If you highlight content, the Link Text will prefill. Otherwise, choose what text will contain the link. Additionally, you may also choose to open links in a new tab.

Click Add Link at the bottom.

Once a link is created, it will display with HTML code in the selected cell.

Table Options

The Table Options section has the options to make the first row the header as well as the last row the footer. There are also options for alternating row colors, highlighting rows when hovering over it, printing the table’s name and description, and adding personalized CSS for styling purposes.

Datatable Options

Within the last section, there are three beneficial options: Pagination, Sort, and Search/Filter. Pagination can be customized to show a different number of rows per page. All three options can be turned on with the checkbox.

**Remember always to click Save Changes at the bottom. The preview button allows you to see the table from the visitor’s point of view if you choose to make more changes.

Add to Post

Adding a table to a post can be done with a shortcode. Grab the table’s shortcode (from the table information section or Show Shortcode under the Table Name).

Copy the shortcode, then navigate to a Post.

Once the post is opened for editing, click into the spot you wish to include your table and paste the shortcode. (This will automatically insert a shortcode block and prefill your code into the block.)

Want to learn more about the block editor? Check out Getting Started with Gutenberg (Block Editor) in WordPress

Remember to Update the Post at the top. Once published, the table will appear with all the content and additional styling settings.

Import CSV

A useful feature is the option to Import CSV files.

Within the TablePress tab, select Import. There are several options for Import Source but for this tutorial we will choose File Upload. Once you have selected your file, select the Import Format and Add as New Table.

Once imported, the table’s editing page will display with the table prefilled with information from the CSV file.

Plugins: Responsive Tables and DataTables Buttons.

There are additional plugins directly available from the TablePress plugin on TablePress Extensions – TablePress. It is highly recommended to give a donation for the premium plugins, especially those using the plugins on production websites.

We recommend two of the premium plugins: Responsive Tables and DataTables Buttons.

For DataTables Buttons, modify the shortcode to include and display specific buttons.
For Responsive Tables, define the responsive attribute.

The following example shortcode will display additional buttons and make the table responsive on smaller screens.

[table id=3 responsive="collapse" datatables_buttons="colvis,copy,csv,excel,pdf,print" /]

Below is what the buttons look like in a DataTable.

Below is how the columns look when resized.

Export

Exporting tables can be done through the Export tab.

You can decide which tables to export and how to export them.
For the format, CSV will only export data out while JSON will export data and table options.

Summary

The TablePress plugin allows you to display tabular data in WordPress. Benefits of this plugin include creating tables from a central location and embed across different points using a shortcode, easy creation of tables through CSV import, and an export option to be used in other programs or a secondary backup.

TablePress utilizes the data tables library (jQuery) — allows you to filter, search, download data, and include plugins to enhance functionality than the standard Gutenberg block. The plugin adds more value to developers and visitors to the site by customizing tables and how they are viewed.